24 Apr 2024, 19:50 [ UTC - 5; DST ]
|

| Username Protected |
Message |
|
Username Protected
|
Post subject: New Travel Air owner  Posted: Posted: 23 Sep 2015, 17:28 |
|
 |

|
|
 |

Joined: 08/26/15
Posts: 9546
Post Likes: +8781
Company: airlines (*CRJ,A320)
Location: Florida panhandle
Aircraft: Travel Air,T-6B,etc*
|
|
|
*New owner, not new airplane.
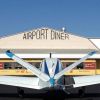
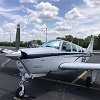
I just bought a Travel Air last week, a fairly well cared-for airplane with moderate hours on the airframe, engines, and props. I spent a respectable sum on the pre-buy inspection but that means I now have a couple, good, local mechanics who have had a good look deep inside the airplane. The airplane is a 1959 95, the early model with the short fuselage (light weight) and carbureted engines.
Lots of military pilot hours (Navy) flying helicopters and prop airplanes (singles) and getting my multi add-on shortly as my own schedule allows. Watching the used light twin market, this airplane looked like a pretty good bet even though it happened before I my ratings were ready for it.
Been reading lots and lots here on BeechTalk and I really like the knowledge, technical sophistication, and humor of many of the threads.
Cheers!
Jim
|
|
| Top |
|
|
Username Protected
|
Post subject: Re: New Travel Air owner Posted: 23 Sep 2015, 19:39 |
|
|
|
|
|
Joined: 08/26/15
Posts: 9546
Post Likes: +8781
Company: airlines (*CRJ,A320)
Location: Florida panhandle
Aircraft: Travel Air,T-6B,etc*
|
|
Username Protected wrote: Almost forgot. Pictures or it didn't happen!  I'm soooo busted! The lighting in this photo is unintentionally quite flattering  Attachment: Travel Air.jpg
Please login or Register for a free account via the link in the red bar above to download files.
|
|
| Top |
|
|
Username Protected
|
Post subject: Re: New Travel Air owner Posted: 27 Sep 2015, 18:24 |
|
|
|
|
 |
Joined: 09/16/10
Posts: 8892
Post Likes: +1956
|
|
Glad you are here Jim! Your plane looks pretty good, nice picture and congrats on your acquisition! 
_________________
If you think nobody cares about you. Try not paying your income tax.
|
|
| Top |
|
|
Username Protected
|
Post subject: Re: New Travel Air owner Posted: 07 Oct 2015, 12:46 |
|
|

|
|
Joined: 01/27/14
Posts: 78
Post Likes: +19
Location: WH, AR
|
|
|
Welcome to Beechtalk Jim! That's a great looking Travelair! I have one and I have really enjoyed it so far and I know you will as well.
|
|
| Top |
|
|
Username Protected
|
Post subject: Re: New Travel Air owner Posted: 21 Jan 2016, 23:31 |
|
|
|
|
|
Joined: 08/26/15
Posts: 9546
Post Likes: +8781
Company: airlines (*CRJ,A320)
Location: Florida panhandle
Aircraft: Travel Air,T-6B,etc*
|
|
Now I have shoulder belts! Attachment: IMG_20160118_212712031.jpg I bought the BAS kit for my front seats and put them in this past weekend (owner-assisted, my A&P is really great to work with). I worked reeeeally slow so that I didn't mess anything up and I probably worked north of 20 hours. My labor was roughly equal parts divided three ways: peeling back the ceiling upholstery and removing my front seats, drilling holes/hardware installation (including fabbing a couple shims and some bushings for the lap belts), and putting the ceiling upholstery back (including wrestling with the front seats). The kit is quite straightforward with easy to follow instructions and pictures. I thought the lap belt bushings were a strange thing to omit on the hardware list (1/4" I.D. to 3/8" O.D. and about .200" thick). The shims I mentioned are in the instructions and you only need them if the stringers on your fuselage ceiling are slightly far apart. Yes, you do need to drill holes in the roof (only two though, for a couple of 3/16" screws). No, there is no reason to worry about these holes leaking water or corrosion if you're the least bit careful about them. I did need to use a compact angle drill to drill some of the holes around the brackets. I am, quite honestly, ecstatic to finally have these shoulder belts- it bothered me a lot to have only lap belts in my front seats. The original manual describes shoulder belts, but as best I can tell it was some kind of Rube Goldberg arrangement with a long third belt coming up from behind the seat, over one shoulder, and across the chest. The seat backs don't quite come up to normal people's shoulders which means that that goofy shoulder belt arrangement would have been a great recipe for spinal trauma in a crash (almost as bad as face trauma... no thanks). Anyhoo...
Please login or Register for a free account via the link in the red bar above to download files.
|
|
| Top |
|
|
Username Protected
|
Post subject: Re: New Travel Air owner Posted: 29 Sep 2016, 14:09 |
|
|
|
|
|
Joined: 08/26/15
Posts: 9546
Post Likes: +8781
Company: airlines (*CRJ,A320)
Location: Florida panhandle
Aircraft: Travel Air,T-6B,etc*
|
|
Got a PM yesterday asking me about the angle of attack instrument (CYA-100) I put in my plane, so I figured I'd put a couple pictures on here. Here is the display. I wasn't finished installing it when I took this picture and I put the compass back on later. I put it on the glareshield, in my field of view. I had to make a little metal bracket to hold it there next to the mag compass. There is not enough current in the display to influence the compass (and besides, I ran the positive and ground wires next to each other). I chose to orient the display as the top lights mean high AoA/bottom = low because that's what I'm used to flying with. All of the LEDs are lit because the box is going through its startup sequence. Normally just one is lit. Attachment: AoA display.jpg Here is where I put the vane- on the nose cone close to and under the front, in "clean" airflow and away from the influence of the propellers. I made a small backing plate inside although that it is probably unnecessary for the ~ 1/4" thick fiberglass nose cone (the instructions say that the vane makes something like .7lbs drag at 250 knots, and much much less at normal Travel Air speeds). Attachment: AoA vane.jpg Otherwise, I put a dedicated on/off switch on my panel along with a placard stating something or other like "do not use as a primary reference." The instructions are very easy to follow and they cover all of that.Knowing what I know now, how easy it is to remove the leading edges of a classic Beechcraft, I might have given more consideration to putting the vane way out under one of the wings- but the nose cone works great (it doesn't get in the way of towing, for example). If any of my mechanically inclined fellow BT'ers used to use Haynes manuals to fix their cars then you remember the 1-5 wrench scale. This job was about a 2 or a 3 level of difficulty.
Please login or Register for a free account via the link in the red bar above to download files.
|
|
| Top |
|
|
You cannot post new topics in this forum
You cannot reply to topics in this forum
You cannot edit your posts in this forum
You cannot delete your posts in this forum
You cannot post attachments in this forum
|

Terms of Service | Forum FAQ | Contact Us
BeechTalk, LLC is the quintessential Beechcraft Owners & Pilots Group providing a
forum for the discussion of technical, practical, and entertaining issues relating to all Beech aircraft. These include
the Bonanza (both V-tail and straight-tail models), Baron, Debonair, Duke, Twin Bonanza, King Air, Sierra, Skipper, Sport, Sundowner,
Musketeer, Travel Air, Starship, Queen Air, BeechJet, and Premier lines of airplanes, turboprops, and turbojets.
BeechTalk, LLC is not affiliated or endorsed by the Beechcraft Corporation, its subsidiaries, or affiliates.
Beechcraft™, King Air™, and Travel Air™ are the registered trademarks of the Beechcraft Corporation.
Copyright© BeechTalk, LLC 2007-2024
|
|
|
|